Your First Node
Each Node is essentially a building block with Properties that can communicate with other Nodes. A Node is a "black box" where the internal logic is completely hidden from another Node. Everything that a Node does, everything it allows other Nodes to connect to, these things are entirely up to the Node author.
To create a Node, we need these pieces of information:
- Manifest Declaration: The general information about the Node, e.g. name, description.
- Properties Declaration: The list of properties that the Node exposes.
- Code: Optional code or logic that will execute on behalf of the Node.
Develop instantly via the web
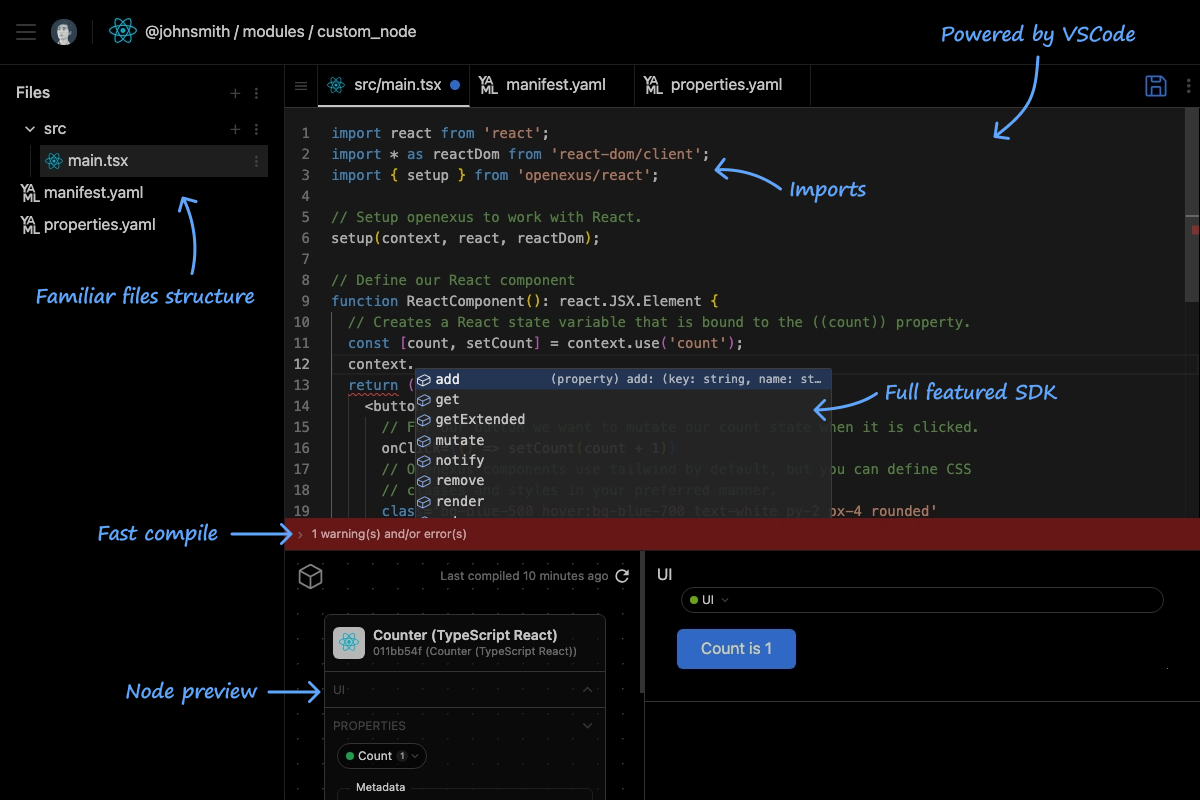
The easiest way to develop a node is to use the Openexus online node editor. Even without an account, you can try it at Developer Playground. If you have an Openexus account, you can create custom nodes within your user namespace.
Develop locally
The ability to develop nodes on your own setup is coming soon.
Manifest Declaration
The Manifest Declaration describes your Node from a high level point of view. Things like name, description, categories, and documentation all go in your Manifest. The values you enter here help guide others in finding and using your Node, so they are very important.
For your first Node, let us keep this very simple: We will enter just a name and a description.
name: My First Node
description: This is my very first node and I am super excited to see it work!
Properties Declaration
A Properties Declaration describes specific data properties that a Node exposes. A property is a holder of a value that a node uses for input, output, or both. Some properties in a Node are internal and just for a Node to use. Others are external and intended for other Nodes that interact with the Node to use. The Properties Declaration is where you describes these properties.
The Properties Declaration is made up of zero or more Property declarations. Each Property you want to expose is described here.
For each Property you must specify at least a Property Key, but we also recommend you provide a datatype.
The Property Key is the name of the Property one will use to reference that Property whenever we want to interact with it. It is strongly encouraged to use meaningful and understandable names. Calling a Property a is not as helpful as calling it firstname. There are specific rules about what a Property Key must look like, so make sure to read the Property Keys section of the Open Node Protocol specification.
view:
  datatype: web-view
count:
  datatype: number
  default: 1
Code
The Code of a Node defines the logic of what happens when the Node is executed and when some property the node is observing changes in some manner. Every Node executes its code when it is created each time and that code may also specify additional functions to execute as the Node changes. The details of this are up to the developer.
The programming language and any framework a Node uses is flexible so long as Openexus supports it. For our first Node here, let us use JavaScript with the Solid framework.
import * as solidWeb from 'solid-js/web';
import * as solid from 'solid-js';
import { setup } from 'openexus/solid';

// Setup the context for use with solid
setup(context, solid, solidWeb);

function MyFirstSolidComponent() {
  // Creates a solid signal that is synced with the node property 'count'
  const [count, setCount] = context.use('count');

  function increment() {
    // update the node property
    setCount(count() + 1);
  }

  return (
    <div>
      <p>You have clicked the button {count()} times.</p>
      <button
        onClick={increment}
        class='mt-2 bg-blue-500 hover:bg-blue-700 text-white py-2 px-4 rounded'
      >
        Click Me!
      </button>
    </div>
  );
}

// Wrap MyFirstSolidComponent with render helper and set as view
context.set('view', context.render(MyFirstSolidComponent));
An Example Node
This is a basic Node with a button that will increment a ((value)) Property every time the button is clicked.
- Vanilla
- React
- Vue
- Svelte
- Solid
Simple counter button example without using any external libraries.
name: Counter (JavaScript)
description: An example using JavaScript and no framework to render a simple button that displays the number of times the button is clicked.
categories: starter/javascript,starter/vanilla
keywords: starter,javascript,vanilla,counter
icon: logos:javascript
environments: browser
sandbox: browser.shadow
view:
  datatype: web-view
count:
  datatype: number
  description: The number of times the button has been clicked since this application was started. This represents using a simple Property in the Openexus system.
  default: 1
/**
 * An example using JavaScript and no framework to render a simple
 * button that displays the number of times the button is clicked.
 */

let button;

// Define a render function to return our HTMLElement to display.
function render() {
  // Create the element.
  button = document.createElement('button');

  // Populate the element.
  button.innerHTML = `Count is ${context.get('count')}`;

  // Openexus components use tailwind by default, but you can define CSS
  // classes and styles in your preferred manner.
  button.classList.add('bg-blue-500', 'hover:bg-blue-700', 'text-white', 'py-2', 'px-4', 'rounded');

  // For our button we want to mutate our count state when it is clicked.
  button.addEventListener('click', (value) => {
    context.set('count', context.get('count') + 1);
  });

  return button;
}

// Register to be notified when ((count)) changes.
context.subscribe('count', (value) => {
  if (button) button.innerHTML = `Count is ${value}`;
});

// Set our render function to the ((view)) property for rendering.
context.set('view', context.render(render));
Simple counter button example using React.
name: Counter (TypeScript React)
description: An example using TypeScript and the React framework to render a simple button that displays the number of times the button is clicked.
categories: starter/typescript,starter/react
keywords: starter,typescript,react,counter
icon: logos:react
compiler: react@19
environments: browser
sandbox: browser.shadow
view:
  datatype: web-view
count:
  datatype: number
  description: The number of times the button has been clicked since this application was started. This represents using a simple Property in the Openexus system.
  default: 1
/**
 * An example using TypeScript and the React framework to render a simple
 * button that displays the number of times the button is clicked.
 */

// Import needed framework libraries.
import * as reactDom from 'react-dom/client';
import react from 'react';

// Import the openexus setup utility for the React framework.
import { setup } from 'openexus/react';

// Setup openexus to work with React.
setup(context, react, reactDom);

// Define our React component
function ReactComponent(): react.JSX.Element {
  // Creates a React state variable that is bound to the ((count)) property.
  const [count, setCount] = context.use('count');

  // Return our component's JSX.
  return (
    <button
      // For our button we want to mutate our count state when it is clicked.
      onClick={() => setCount(count + 1)}
      // Openexus components use tailwind by default, but you can define CSS
      // classes and styles in your preferred manner.
      class='bg-blue-500 hover:bg-blue-700 text-white py-2 px-4 rounded'
    >
      {`Count is ${count}`}
    </button>
  );
}

// Set our React component to the ((view)) property for rendering.
context.set('view', context.render(ReactComponent));
Simple counter button example using Vue.
name: Counter (TypeScript Vue)
description: An example using TypeScript and the Vue framework to render a simple button that displays the number of times the button is clicked.
categories: starter/typescript,starter/vue
keywords: starter,typescript,vue,counter
icon: logos:vue
compiler: vue@3
environments: browser
sandbox: browser.shadow
view:
  datatype: web-view
count:
  datatype: number
  description: The number of times the button has been clicked since this application was started. This represents using a simple Property in the Openexus system.
  default: 1
<script setup>
// Define our Vue component

// Creates a Vue state variable that is bound to the ((count)) property.
const countRef = context.use('count');

// For our button we want to mutate our count state when it is clicked.
function onClick() {
  countRef.value = countRef.value + 1;
}
</script>

<!--
  Openexus components use tailwind by default, but you can define CSS
  classes and styles in your preferred manner.
-->

<!-- Return our component's JSX. -->
<template>
  <button @click="onClick" class="bg-blue-500 hover:bg-blue-700 text-white py-2 px-4 rounded">
    Count is {{ countRef }}
  </button>
</template>
/**
 * An example using TypeScript and the Vue framework to render a simple
 * button that displays the number of times the button is clicked.
 */

// Import needed framework libraries.
import * as vue from 'vue';

// Import the openexus setup utility for the Vue framework.
import { setup } from 'openexus/vue';

// Import our child vue component.
import VueComponent from './VueComponent.vue';

// Setup openexus to work with Vue.
setup(context, vue);

// Set our Vue component to the ((view)) property for rendering.
context.set('view', context.render(VueComponent));
Simple counter button example using Svelte.
name: Counter (TypeScript Svelte)
description: An example using TypeScript and the Svelte framework to render a simple button that displays the number of times the button is clicked.
categories: starter/typescript,starter/svelte
keywords: starter,typescript,svelte,counter
icon: devicon:svelte
compiler: svelte@5
environments: browser
sandbox: browser.shadow
view:
  datatype: web-view
count:
  datatype: number
  description: The number of times the button has been clicked since this application was started. This represents using a simple Property in the Openexus system.
  default: 1
/**
 * An example using TypeScript and the Svelte framework to render a simple
 * button that displays the number of times the button is clicked.
 */

// Import needed framework libraries.
import * as svelteStore from 'svelte/store';
import * as svelte from 'svelte';

// Import the openexus setup utility for the Svelte framework.
import { setup } from 'openexus/svelte';

// Import our child Svelte component.
import SvelteComponent from './SvelteComponent.svelte';

// Setup openexus to work with Svelte.
setup(context, svelte, svelteStore);

// Set our component to the ((view)) property for rendering.
context.set('view', context.render(SvelteComponent));
<script lang="ts">
  // Define our Svelte component

  // Creates a Svelte writable that is bound to the ((count)) property
  const countWritable = context.use('count');

  let count: number | undefined;

  // Register to be notified when ((count)) changes.
  countWritable.subscribe((value: number) => {
    count = value;
  });

  // For our button we want to mutate our count writable when it is clicked.
  function onClick(): void {
    countWritable.set(count + 1);
  }
</script>

<!--
  Openexus components use tailwind by default, but you can define CSS
  classes and styles in your preferred manner.
-->

<!-- Return our component's JSX. -->
<button
  on:click={onClick}
  class='bg-blue-500 hover:bg-blue-700 text-white py-2 px-4 rounded'
>
  Count is {count}
</button>
Simple counter button example using Solid.
name: Counter (TypeScript Solid)
description: An example using TypeScript and the Solid framework to render a simple button that displays the number of times the button is clicked.
categories: starter/typescript,starter/solid
keywords: starter,typescript,solid,counter
icon: logos:solidjs-icon
compiler: solidjs@2
environments: browser
sandbox: browser.shadow
view:
  datatype: web-view
count:
  datatype: number
  description: The number of times the button has been clicked since this application was started. This represents using a simple Property in the Openexus system.
  default: 1
/**
 * An example using TypeScript and the Solid framework to render a simple
 * button that displays the number of times the button is clicked.
 */

// Import needed framework libraries.import * as solidWeb from 'solid-js/web';
import * as solidWeb from 'solid-js/web';
import * as solid from 'solid-js';

// Import the openexus setup utility for the Solid framework.
import { setup } from 'openexus/solid';

// Setup openexus to work with Solid.
setup(context, solid, solidWeb);

// Define our Solid component
function SolidComponent() {
  // Creates a Solid signal that is bound to the ((count)) property.
  const [count, setCount] = context.use('count');

  return (
    <button
      // For our button we want to mutate our count signal when it is clicked.
      onClick={() => setCount(count() + 1)}
      // Openexus components use tailwind by default, but you can define CSS
      // classes and styles in your preferred manner.
      class='bg-blue-500 hover:bg-blue-700 text-white py-2 px-4 rounded'
    >{`Count is ${count()}`}</button>
  );
}

// Set our Solid component to the ((view)) property for rendering.
context.set('view', context.render(SolidComponent));
Beyond Getting Started
By now, you know the basics of node creation!
- Examples is a good place to see how to create various different types of nodes.
- Specification is a good place to learn about the complete specification of a node.
- Javascript/Typescript is a good starting point to learn more about using the SDK to create nodes.